Monday, July 12, 2010

Kitchen Update

I think I must be the SLOWEST painter EVER in the history of the world!  How's that for dramatic?  Actually I just need to stop trying to do so many different things at once. I have way too many projects going.  :-)

I am still not finished painting my kitchen island... let me rephrase that, the island is painted, but the doors and drawers are not yet painted, and of course I still need to distress it.  Since my friends and family have been hounding me pleasantly inquiring on the status of the kitchen and asking for updated photos, I thought I should go ahead and post an update.

I purchased a metal scroll piece (sorry, I don't know what it is called) at Hobby Lobby (half off, of course), and asked my tile guy if he could hang it on the tile and build a frame around it.  I absolutely LOVE how this turned out. 

How about a before shot first (yes, the tiles on the counter and backsplash are indeed the same tiles that were used on the floor):


...and after:
I really love how the light seems to highlight it... like we planned  it that way (we didn't, that was just a bonus).

On to the island.... here is what we started with:

Here  it is with granite and the legs added (love these legs)
 
here it is the after a coat of primer


and here it is with the brown paint... keep in mind I still need to distress it.

 As pretty as these legs are, they are certainly NOT fun to paint. 

The corbels have not been painted yet either.  I think I have decided to paint them the same color as the island... unless I change my mind again. :-)  I hope to have it all finished by the end of the week.  Wish me luck.

~Lisa

Linking up to the following:
The DIY Show OffJoin us Saturdays at tatertotsandjello.com for the weekend wrap up party!


Birthday Wedding cakes crafts parties

Friday, July 2, 2010

Kitchen Makeover

Here is our kitchen before.  These photos were taken before we closed on the house. 

This first photo is a view from the living room.  I love how open the kitchen is. 

Here you can see that the countertops were tiled with the same tile that was used on the floor.  We are replacing it with granite. I don't know if you can tell from the photo, but the tile is sort of a pink color. 

Lots of counter space and storage.  I intend to make the island look more like a piece of furniture by adding legs to the four corners and painting it a dark chocolate or expresso brown.  The rest of the cabinets will receive a brown glaze.

We will also change out the appliances for stainless.  The microwave quit working the day after we moved in, so it was replaced almost immediately. 

The sink will be a brown composit granite sink and the faucet will be oil rubbed bronze.  We will eventually replace the floors too... but that will have to wait for now.

Here is a photo of the granite I selected.
The wall color is a warm color that goes well with the granite.  The corbels for the bar area.  These corbels are 14" long by 8" deep and I found them locally for just $37 each... a great price for corbels that size.  Much better than anything I found at Lowe's or Home Depot.  The brand is Du Bois in case anyone in interested. 

The legs I purchased for the island and the hardware for the cabinets. 

I forgot to take a photo of the tile, sink and faucet, but this post already has enough photos anyway.  :-)

The granite and tile guys are finishing up today, so I will post some after photos in the next day or so. 
Thanks for stopping by.
~Lisa

Linking up to the following:


Join  us Saturdays at tatertotsandjello.com for the weekend wrap up    party!

Monday, June 28, 2010

Fourth Of July Wreath


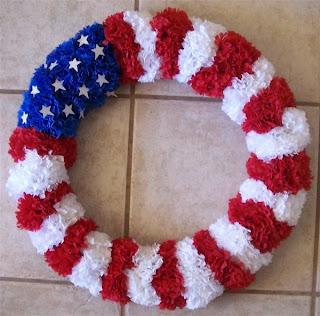
I saw a pretty Fourth Of July wreath made with red, white, and blue roses (on Lillian Vernon website).  However, the wreath was much too small for my front door.  While in Dollar Tree, I noticed they had red, white, and blue carnations... perfect for making my version of the wreath!  I bought several bunches of the carnations and picked up a wreath form. 

I removed all the flower tops from the stems and used my glue gun to adhere them to the wreath form.


For about $12.00 and under an hour, this is the result.  Iam pleased with how it turned out.  I used a paper punch for the stars.


Thanks for stopping by.

~Lisa

Linking up to the following:
The DIY Show Off
Visit thecsiproject.com


Tuesday, June 8, 2010

Fireplace Makeover, Take 2

Back in March I decorated my fireplace with plants for spring.  Well... two of the plants didn't make it, so I needed to come up with something to fill the void.  I shopped the house and found some unused candle sticks for the one side and decided a moss ball for the other side would look good. 

Here is the before (when the plants were still alive):

The after, with the candle sticks and moss ball:


Now if I can't keep the remaining two plants alive, I don't know what I will replace them with.  :-)  I made the moss ball with items from the dollar store... a total of $2, can't beat that.  I purchased a rubber ball from the toy section and two bags of moss (I only used one bag of the moss) and the glue I already had. 


I just spread the glue onto the ball and smashed the moss into the glue.  Very quick.  Very easy.  Very messy (the reason for the plastic under my project, I just carried the plastic outside when I finished and shook it off in the grass). 


Just for fun... Sophia and Priscilla found a snail in the back yard and were quite enamored with it.  They are so adorable!  The girls, not the snail.  :-)


Yes, that is pink stain on the patio (what was previous owner thinking), staining the patio is on the (very long) list of things to do.  :-)

Thanks for stopping by.
~Lisa

Linking up to the following:


The DIY Show Off


Visit thecsiproject.com

Thursday, May 27, 2010

DIY (Big) Clock

About 5 years ago, I purchased a large 32" clock on clearance at Kirkland's. I believe I paid about $20 for the clock and I LOVE it. My mom has always admired the clock and the two of us have searched everywhere for one like it (that is affordable). No luck. So this year I decided that I would make her one for Mother's Day.


Here is a photo of the clock I purchased at Kirkland's.  It is sitting on the top shelf of one of the shelves to the side of the fireplace.  I removed one of the shelves to make room for it.


Here is a photo of the knockoff clock I made for mom.

Mom loved her new clock. If you want to know how I did it... keep reading. :-)

First I needed to find something to make the clock base.  I checked Lowes and Home Depot for a pre-cut wood circle, however they didn't have one large enough and those things are HEAVY.  Then I thought about using the round top from one of those decorating tables, the kind that has three legs than screw in the bottom and you cover with a table cloth.  It seems no one sells them anymore in my area and the ones I found online were very pricey.  Finally, at Hobby Lobby I was looking at the foam core board... it was large enough... only $5.99... perfect!

I took my clock down and put it on top of the foam core board, traced it then cut it out with an exacto knife.  To smooth the edges, I used a very fine grit sand paper.  You could also get a perfect circle by putting a push pin in the center of the foam core tied to a string with a pencil on the end.  

Next I painted with red spray paint.  It took about 5 coats of paint to get an even coverage.  I probably should have used black foam core instead of white.  I think it may have been easier to cover with the red paint. 

I purchased the clock parts at Hobby Lobby.  The kit with the pendulum had hands that were way too small for this clock.  I found another kit that had large hands and also came with vinyl numbers.  I was very excited to find this kit because that meant I didn't have to paint the the numbers on freehand.  :-)  All clocks were on sale for half off that week, so they let me have the clock kits at half off as well. 


I found the center of my clock and cut a hole with the exacto knife for the clock mechanism.  The large clock kit came with a template for adding the numbers, so that was pretty easy to do.  It is easier for the spacing to add the twelve and six first then the three and nine then fill in from there.  However, I didn't use the number six since I would be cutting a hole for the pendulum.


Once I had all the numbers on, I used a gold paint pen to trace around them. 
If you look back at the clock I purchased, it has some metal gold accent pieces at the top and bottom of the clock.  At Hobby Lobby, I found the package of buttons in the scrapbook section and the metal piece I used for the top portion was in the jewelry section. 


The gold circle around the pendulum area is scrapbook paper cut with nestibilities dies.


The stencil is one that I already had in my studio.  I used the same gold paint pen for the stenciled area hat I used to trace around the numbers.

I think that is everything.  Thanks for stopping by. :-)

Linking up to:


DIY Day @ ASPTL
Join us Saturdays at tatertotsandjello.com for the weekend wrap up party!
Visit thecsiproject.com